Thursday, September 29, 2011

A Delicious Start to Fall Meals


I envy those people with cat-like reflexes that are able to catch a glass of milk that is teetering dangerously on the edge of a table, but I never understood why people try to catch the glass of milk after it's already fallen.  You know what I'm talking about.  It's 2 seconds from shattering all over the floor and you jut your arm out there as if your reaction is quicker than gravity.

Well, folks.  That's what happened to me.  For a split second I thought I was Flash, with superhuman reflexes that defied laws of physics, as I reached my hand out to catch my apple cider vinaigrette falling from the counter.  Before I even moved, I knew I couldn't catch it, but reaching for it seemed more plausible than standing there like an oaf.  Needless to say, it ended up all over the floor, but I was able to salvage enough for one last salad with my not-so-cat-like reflexes before the entire contents of the broken jar spilled out.

So, unfortunately, I do not have a photo of this sweet & tangy vinaigrette, but I do have a recipe.  So I'm urging you to make this.  Trust me.  Along with the salad.  Apples + Gorgonzola?  Yes please.  In the past two days I've eaten this salad twice and made a grilled gorgonzola & apple sandwich.  What is it with me and apples + cheese?  Probably the fact that the combination is epic.  Yes.  You read correctly.  E.P.I.C.  Or it could be the fact that I have nothing else in my fridge, so I'm just throwing stuff together and hoping it tastes edible. 


Spinach & Apple Salad
-serves 1

2 handfulls of washed fresh baby spinach
1/2 red delicious apple, thinly sliced
gorgonzola cheese
candied pumpkin seeds
apple cider vinaigrette (recipe below)

This makes a large salad.  I'm normally not a person who orders salad anywhere... unless it come with a steak and baked potato, but this was definitely a filling lunch.  If you're only making one salad like I did, put some peanut butter on the rest of those apple slices - it makes a really great side to the salad.


Apple Cider Vinaigrette
-makes 1 1/2 cups

1/4 c apple cider vinegar
1/4 c Motts Melody Apple (I'm sure if you use apple juice it will taste the same, it's just all I had on hand)
2 tbsp brown sugar
1/4 tsp chili powder
1/4 tsp ground cinnamon
1 c olive oil

In a bowl, whisk the vinegar, apple juice, brown sugar, chili powder and ground cinnamon until the brown sugar dissolves.  Continue whisking as you slowly add the olive oil until the dressing is emulsified.

Wednesday, September 28, 2011

Candied Pumpkin Seeds Recipe


I adore pumpkins.  Seriously.  I adore them so much that my husband proposed to me in the middle of a pumpkin patch.  I'm a fan of their symbolism, their appearance, and especially their taste.  So it should be no surprise that I love what's inside of them:  Pumpkin seeds!  Pumpkin seeds are actually quite healthy and having them as a regular part of your diet provides you with many healthy benefits.  Although, I'm sure making candied pumpkin seeds voids all those healthy vitamins and minerals and puts your glycemic index on the roller coaster of its life.  But heck, they're small - like m&m's, so go for it!  Oh.  And I hate to bust your bubble, but did you know that you have to walk the entire length of a football field to burn off all the calories you just ingested from one single, stinking m&m? But who's counting?  Really?

I enjoy using different flavors when working with pumpkin seeds.  Sometimes a little sea salt and a good roast is all they need to reach perfection.  This time, however, I had a specific idea in mind and wanted to sprinkle these little suckers over a delicious autumn salad.  I think it was the perfect final touch.  They had a nice combination of spicy and sweet, pairing amazingly with the salad... but trust me, they are great to just nibble on alone!


Candied Pumpkin Seeds
-makes 1/2 cup

1/2 c pumpkin seeds
2 tbsp brown sugar
2 tbsp sugar
1/2 tsp ground cinnamon
1/2 tsp chili powder

Add all the ingredients to a small saucepan and place over medium high.  Cook until the sugar begins to melt and coats the pumpkin seeds in all its sugary goodness.  Pour pumpkin seeds out onto a cookie sheet and allow to cool.  Break into pieces and place in an air tight container.


Tuesday, September 27, 2011

Back to the Beginning


I'm a huge fan of the cheddar + apple + egg combination.  The first brunch I made once my husband and I moved in together was Martha Stewart's cheddar apple frittata.  I'm pretty sure I ate 3/4's of the dish myself. 

I'm also a huge fan of individual portioned meals.  It just makes it a heck of a lot easier for me to freeze the left over portions when they are already divided.  This way, I don't plan on freezing half of the dish, and end up eating 3/4's of it in one sitting...

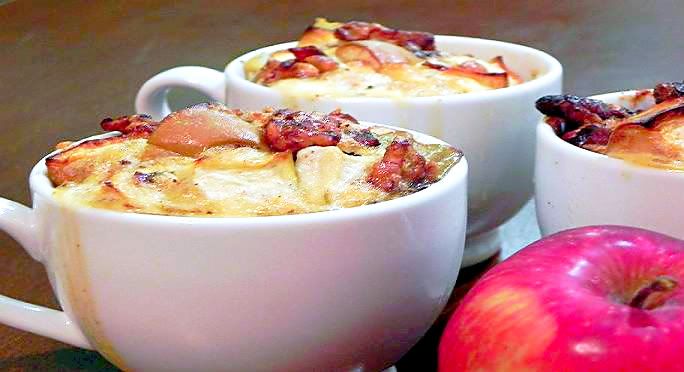
I got the ispiration of using mugs from a user on Pinterest.com who made the dish with thoughts of her son in mind.  Now, I didn't make the same egg dish as her, but I'm sure hers was just as scrumptious as mine.  I mean, who could go wrong with apples + cheddar cheese?  And really?  Why stop there.  I added some walnuts and bacon.  Because, you know... everything is better with bacon. 


Apple Cheddar {Walnut & Bacon} Egg Bake
-serves 4

1 c & 2 tbsp egg whites
2 apples (cored and cubed)
1/2 c shredded cheddar cheese
5 strips of bacon (cooked and crumbled)
1/4 cup walnuts

Preheat the oven to 350F.  Spray 4 coffee mugs* (or ramekins) with non-stick cooking spray. 
Pour the egg whites into a large bowl, add the apples, cheddar cheese, bacon crumbles, and walnuts.  Mix until all ingredients are incorporated into the eggs.

Scoop into the mugs/ramekins.

Bake for 35-40 minutes. 


*NOTE:  My coffee mugs are extremely small.  When I bought them, my mom made fun of how small they were.  My husband even bought me a new mug that says "My Big Mug" on the front of it.  Well, because they are so small, my eggs bubbled over.  Way over.  There was a mess.  Thankfully I'm smart and put a cookie sheet below them.  If you have small mugs as well, you might need to seperate the egg mixture into 5 mugs.

FREEZE IT:  Because these are already portioned out, they are extremely easy to freeze.  Just slide a knife around the edge of the mug and the egg bake should fall right out.  Allow to cool completely and wrap in foil.  Slide each foil wrapped egg bake into a plastic freezer bag, label, and pop in the freezer.  These make convenient breakfasts for when you've woken up late for work or just don't feel like preparing something from scratch. 

Monday, September 26, 2011

Happy Autumn!


Autumn.  It's my favorite time of year. Unlike most, I can't wait to give up the scortching weather and the clothing to go with it.  I love bundling up.  I love bundling up with a nice hot bowl of soup.  And while this recipe might not be for a bowl of soup, there will definitely be many of those to come during this autumn season. 

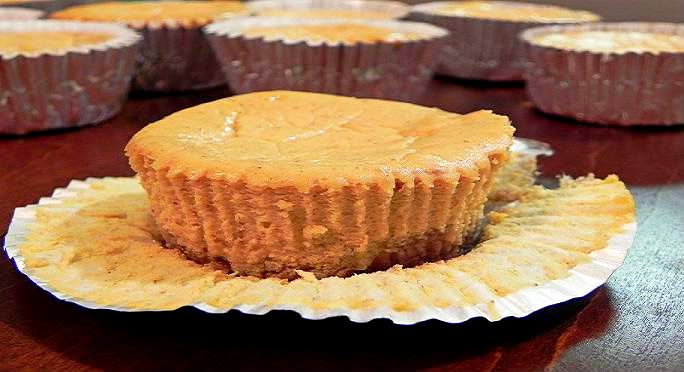
So today I present you with individual sweet potato pie cheesecakes with a gingersnap crust.  Sweet potato, eh?  Yes.  Sweet potato.  The reason I chose sweet potato is because I still had quite a bit in the refrigerator after making some sweet potato granola bars (more like crumble - since I didn't wait for the bars to cool and they broke into a million pieces).  I adapted the recipe from Lauren's individual ginger pumpkin cheesecakes.  She honestly has the best site ever and I'm pretty sure in the past year, I've made about 95% of her recipes. 

I really enjoy the whole individual part of this recipe.  I originally made the cheesecakes for a friend's birthday and set some aside to keep at the house for when cravings strike.  The cheesecake is creamy with such a wonderful flavor, I couldn't resist.


Individual Sweet Potato Pie Cheesecakes
makes 18 individual cheesecakes

crust:*
1 cup ground gingersnap cookies
1/2 tsp ground ginger
3 tbsp melted butter
cheesecake:
16 oz neufchatel cream cheese, at room temperature
2/3 c sweet potato puree
1/2 c lightly packed brown sugar
1/2 tsp vanilla extract
1/2 c plain Greek yogurt
pinch of salt
1 tsp pumpkin pie spice
1 tsp ginger
2 large eggs

Preheat the oven to 350F.  Line muffin tins with paper liners.  Mix the ground gingersnap cookies, ground ginger and butter in a mixing bowl.  Press gingersnap mixture into the bottom of each muffin tin.  Bake in the oven for 5 minutes.

Lower your oven temperature to 275F.  In the bowl of your electric mixer, beat the cream cheese and sweet potato puree until creamy.  Add in the brown sugar, vanilla extract, Greek yogurt, salt, pumpkin pie spice and ground ginger.  Beat until combined.  Beat the eggs in one at a time. 

Spoon the batter evenly into 18 lined cups.  Tap the pan lightly on the counter to even out the tops of the cheesecakes. 

Bake for 22 minutes, or until the cheesecakes have set.  Let cool completely on a wire rack and then place in the refrigerator for at least 2 hours or until serving time.


*NOTE:  Lauren used gingersnap cookies by themselves for the crust.  I didn't have gingersnap cookies on hand that were large enough to fit in the bottom of the tin, so I crushed them up and made my own crust.

Monday, September 19, 2011

The turning of a season & a project(s) to go with it.


Ah, we just had a lovely weekend down here in the south.  It was mid-seventies Friday-Sunday, and although I may be rushing the seasons, I broke out the boots.  I couldn't help it...but the weather might not have been cool enough for that whole ensemble.  And even though it's not officially autumn yet, and the weather is still hot, there is something I can do.  Begin my crafty projects!  I do enjoy starting new projects (or finishing the projects I had set aside) and with the husband gone on deployment for this holiday season, I need to keep myself busy.

I don't know about the rest of you, but I have just recently been introduced to the world of "Pinterest".  With this site, I'm sure I'll never go bored again.  All of the thoughful ideas definitely had my inner Martha Stewart calling.  So Saturday I drove down towards Jacksonville to this cute little yarn shop where I took a "how to knit" class.  I intended to stay only the duration of the class (9:30-11:30), but somehow time flew by and I was leaving the shop around 5:00 that evening.  I had quite a bit of difficulty - but my mother said practice, practice, practice.  So, that's what I've been doing.  Practicing.  I think I might be getting the hang of it and I'm prepared to start my first real knitting project, but fist...I need to finish another project I started.

My "Moose be Christmas" cross stitching project.  I had originally purchased this pattern to make as a Christmas gift for relatives last holiday season... but I quickly changed my mind and went with a cooking theme, making them all aprons.  A couple weeks ago, my husband left on a 9 month deployment and I realized I needed something to do.  I searched through my bag-o-patterns and found this, thinking it would be perfect to frame and set out with the rest of my holiday decor.  While it's not completed, you can definitely see where the image is going.  Also, you can't notice with the photo, but the fabric has a glitter effect to it, which makes it have a snow-like appearance.  I truely am excited but frightened about all of the recipes and projects piling up in my "make now!" folder on my desktop.  Darn that pinterest and foodgawker!

Wednesday, September 14, 2011

Blueberries 101


Today has been one of those days.  Those days where nothing seems to go quite right. Things you've done a million times before (and a million more in your head) and it still just seems to disappoint. 

For starters.  Blueberries.  I have a love/hate relationship with these tiny little suckers.  They're like a hundred bucks for a handful, North Carolina doesn't seem to believe in carrying canned blueberries on their shelves and the fresh ones they do have on hand.. are no longer blue.  More white than anything, those grossberries.  So, I took it upon myself to can my own.  Now, I won't go saying I'm a prodigy at canning or anything, but I have canned a few things in the past.  So what could go wrong, you ask?  Absolutely everything.  I was only able to purchase 2 pints of blueberries because of the price... after sorting through the moldy ones, I was left with approximately a pint left.  All this work to can 1 pint of stinkin' blueberries.  I also had complications during the canning process, so all-in-all, I was as petrified as could be when pulling my finished jar from the hot bath.  I held the tongs so far out in front of me because in my mind, my jar was going to explode right then and there, because even if I didn't do anything wrong, I felt like I had.  And why did I want these canned blueberries so bad anyway?  Because they are absolutely delicious in cereal.  That's it.  That's the only reason.  I want canned blueberries for my cereal.  Fresh ones just don't cut it for me.  They don't turn my milk blue.

So now, that couldn't have been the only thing to make my day "one of those days".  And it wasn't.  I tend to think I have a bit of an artistic side to me, and I don't particularly like things to be simple.  I wanted to create a cute label for my blueberries.  And why not?  I canned apple butter and peach chutney last year and while cleaning out the chutney jars that weren't being eaten as quickly as I had hoped, I had poured out my apple butter as well.. because nothing was labeled.  I wanted labels.  I needed labels.  Well, a label.  I had in my mind the perfect label - so cute - so creative.  I headed straight for Michaels, the craft store guru of them all.  They had no labels.  Not one.  Zilch.  So I made due with some scrapbooking supplies. *Sigh*

Finally, after finishing canning & labeling, it was picture time.  Except my camera was dead.  Go figure.

Next time, I think I might just beg my mom to spend the $5 and send me a can in the mail.  It'd at least save me the headache.  In the meantime, and hopefully I didn't scare you away from canned blueberries, use this recipe to can your own:


Home-Canned Blueberries
Canned blueberries are delicious and I especially like mine spooned over top of whole grain cereal and milk.  The processing of canning the blueberries is simple and the same process can be used for raspberries, blackberries, huckleberries, mulberries, elderberries and currants.  You, however, can not can strawberries using these directions because strawberries are too soft of a fruit.  The recipe below is for 1 canned pint of blueberries.  If you are planing on canning more than one pint, or even canning quarts of blueberries, alter the recipe accordingly.

- 1 tbsp lemon juice per pint jar
- 2 1/2 c fresh blueberries
- 1/2 c sugar
- 1 c water


First, wash your jar and lid to sanitize them.  The best way to do this is to run them through the dish washer.  Place the jar in the oven (that has been set to a "warm" setting - or about 120F) and place the lid in a saucepan filled with water (but do not allow this water to boil).  Meanwhile, fill your canning bath full of water (you need about an inch above the jars when they are placed in the bath) and bring to a boil.

Wash the berries and sort through them, picking out all the stems, mushy berries and moldy berries.  It's easier to do this if you place them in a large bowl of water and slide your hands through them.  You'll be able to feel the mushy berries between your fingers and spot the moldy ones.  Add the water and sugar to a small saucepan.  Heat on med/high and stir until the sugar has dissolved.

Once the water in the canning bath is at a rolling boil, you can start your canning process.  Pull the jar out of the oven and place 1 tbsp of lemon juice in the bottom.  Add your blueberries to the jar and tap the jar on the countertop to help pack them in there. Add the hot syrup (water and sugar mixture) to the jar leaving a 1/4" to 1/2" headspace and wipe any spills off the rim of the jar.

Use your magnetic lid lifter to take the lid out of the hot water and place it on the jar.  Tighten the ring around the lid and place the jar on the rack in the canner.  Lower the rack, close the lid to the canner, and allow 15 minutes to process. (20 minutes if you decide to use quart jars.)

When the 15 minutes are over, remove the jar and allow it to cool in a draft free area without bumping or touching it.  This usually takes overnight, but I try to be safe and wait an entire 24 hours.  Once cooled, your blueberries are ready to be stored.

Facebook Favorites More